Guide to Photographing Zion National Park Part 1

Ok, this is a blog post for those who are about to go to Zion National Park for the first time and want to photograph the park. Or they have been once before and want to make their photographic experience a bit better. Now if you are someone who has been putting around Zion for a bit, this blog post will not necessarily make your next photo experience better, but stick around and see if I have any tidbits that are useful for you and your planning.
Now lets break down some fundamental things that save any photographic trip.
- Dramatic Weather
- Light
- Season
- Skill Level
- Local Knowledge
The above list is not in any particular order, so lets start with one that has an a higher impact on any photo trip you might plan, Local Knowledge.

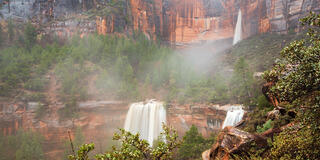
Big Springs was more of a gauntlet and a challenge than I expected.
I first hiked the narrows in my late teenage years... I think. Maybe it was when I was 22, but I am pretty sure it was earlier. The first trips I only went up a mile or so. On my second round of exploration I hiked up to Orderville Slot canyon and went up as far as I could go. Then came the winter adventures and I hiked up to the Imlay Boulder. Then for what ever reason, that became the top. I have hiked up to the Imlay boulder over 4 times now, but this year I was determined to make it to Big Springs.
If you are unfamiliar Big Springs is the top of the bottom up route of the Narrows. It is 4.5 miles of river walking one direction about 10.5 miles including the river walk and the round trip. The hike was brutal because of my ankle, and to my surprise some very deep water. But after hiking for 3+ hours one way I made it to the end of the line, Big Springs. You know what, it was pretty cool.
Local Knowledge
This is the first principle I want to start off with today when it comes to planning a trip to Zion National Park for one good reason, it trumps anything else. Local knowledge might be defined as going to a place, spending a bit of time there, particularly one full day, and see how the light moves across the landscape and get a lay of the land. One full day will make and break a photo experience and lets talk about why.
Google maps, Photo Pills, and TPE show you what a birds eye view of the landscape looks like. They can't show you how in this one spot you were thinking about going there is a pesky tree that blocks the view. In addition they can't show you how the light will hit the peaks accurately. They are a good starting place, but beyond that, they begin to fall flat. They are not clear enough to show you dangers, obstacles and opportunities. These can only be gained in person. So when you are planning any photo trip, find first hand accounts of an area to make sure its safe. Then when you go there, take note of what you see. Try to give yourself a full day of just exploring and getting to know the region. It will help.
Tip 1- Spend a day just driving around and doing a hike or two to get an idea of what Zion has to offer.
Light
Now one of those things that is hard to understand when you see images of Zion is that the "mountains" are almost always edges of plateaus. Not in all places, but if you actually look at a map of Zion from above, it is actually the edge of a plateau that has been chopped up by cracks. Because of this, all the peaks in Zion except a few, actually get light at the exact same time both at sunrise and sunset. The only place where this general rule doesn't hold true is at the south entrance of the park (Springdale).
The mountains that catch light at sunrise are the following: West Temple, East Temple, Backside of Bridge Mountain, and the tip of the Watchman. The court of the Patriarchs sort of catches light at sunrise, but not the first light.
Mountains that catch light at sunset: Bridge Mountain, Mt. Kinesave, The Watchman and the East Temple.
The rest of the time, you will be working with bounce light, or the mountains will be in shade. I would bank on more of your grand landscape images having this quality.

Season
Season has a dramatic effect on Zion, though some seasons feel about the same. Winter in Zion is the least desirable, though it is the best time to to experience low hanging clouds around storms. Spring and Summer share similar qualities, in light and color, though summer brings monsoons. June is the driests month and is the poorest for grand landscapes, but the best for deep canyons like the Narrows and the Subway. From July through September is the time of Monsoons. Sometimes they are daily, sometimes they are sporadic. Fall in Zion goes from about mid October in the upper elevations of the park to mid to late November depending on the year. The general rule of thumb is first weekend of November. That was blown wide open this year (2024) as most of the trees in the lower canyon didn't feel like it.
Skill Level
Some aspects of photography are a skill thing. Can you cohesively put together a scene in a lot of chaos, for example. I find the closer to mouth of the canyon the easier the compositions are. The further you get into Zion the harder they become. So if you are a beginner, stick to the Pa' rus Trail or Watchman Trail. As you feel more confident, go further into the park and work with the canyon walls more.

Dramatic Weather
Weather is a luck thing. You can increase your "luck" if you spend a long time at a place or you have specific things in mind. If you want big dramatic clouds, then July-September is your best chance. If you want snow. January February is your window. But you have to be willing to adjust your plans if you have the capacity to do so. But at the end of the day, photograph what you have and don't worry about getting dramatic weather. Learn to use what you have.